Bit Depth

P1

The term bit depth or colour depth refers to the range of colour available in an image.

The image below shows the possible scale of grays for different bit images.

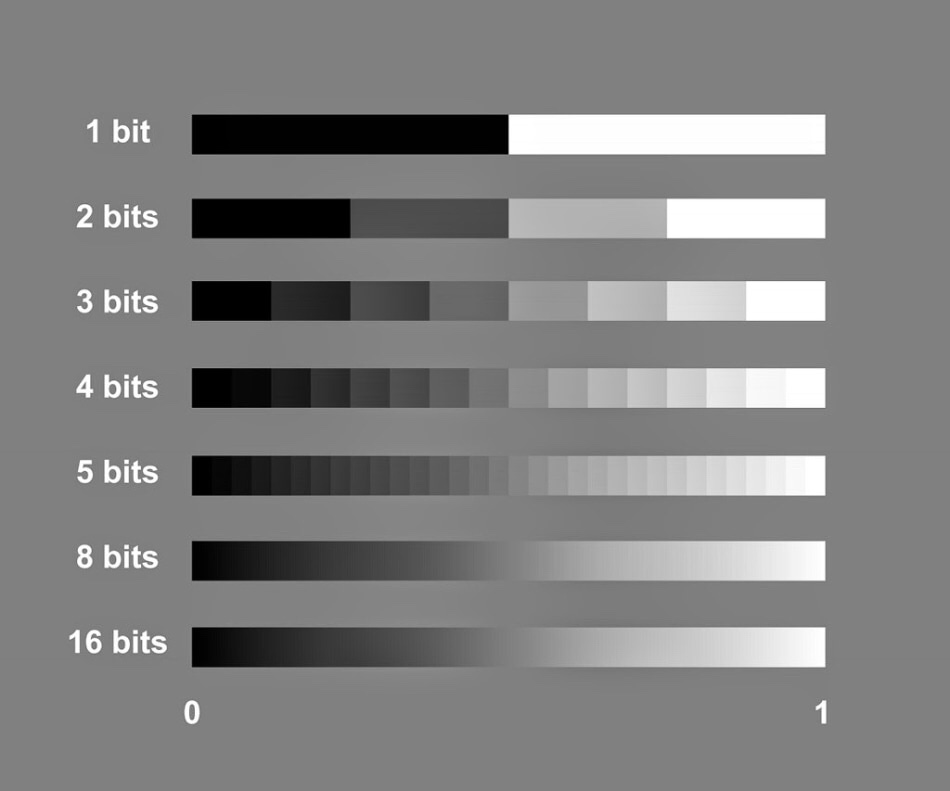
The more bits you have the more shades of grey you can display.

To work out how many shades of gray you will have in an image you use the formula 2 to the power of. For example, an 8 bit image, 2 to the power of 8=256. Black, White and 254 shades of gray.

The table below shows the potential grayscale amount for each size image.

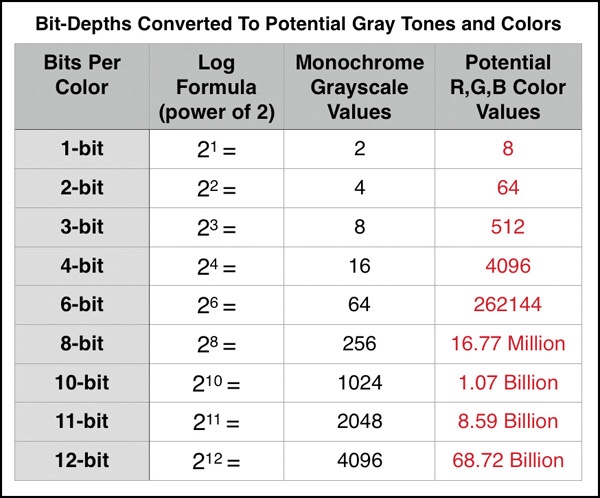
The third column in this table shows the available colour possibilities for the different bit size images. With the 3 channels of colour, Red, Green and Blue.

Red X Green X Blue = Available colour possibilities.

Banding is where you can see a abrupt changes between shades of the same colour. This happens on lower bit depth images.

For example, above you can see two photographs showing shades of the colour purple. The one on the left has a lower bit depth than the one on the right. You can see that the changes in the shades jump and form bands of colour. Whereas the one on the right that has a higher bit depth and shows a gradual change from dark purple to light, with no banding.

RAW files

P1

When using your DSLR camera, shooting in Manual mode will give you total control to produce your desired photography.

Another mode to shoot in is Aperture priority. This semi-automatic mode is good if you’re time restricted and need to get that shot! It offers a shutter speed faster than Manual and is good for situations where the light changes.

I prefer to shoot in Manual mode but need to practice and make use of Aperture priority mode.

It is best to shoot in RAW + JPEG for so many reasons. However there is one downfall with that. You will need to double the amount of storage to store these images. Best not to store them on your computer as it will take up a lot of memory and slow down your device. Always store images on an external hard drive.

JPEG images are great for producing images ready to print, for example an event you print at like photo booth style/party and light conditions wont change. A JPEG file is already compressed (ready to print) meaning that some of the original information is lost and won’t be able to get back in post production. Every time you open or work on a JPEG file you lose quality. This is known as a “lossy”file.

RAW files are files that need to be processed (compressed) before you can view/share or print. They cannot be viewed by any software.

RAW images are exactly what your cameras sensor captures. This allows you to recover the information lost and produce higher quality images. They can be worked on and viewed time and time again and no information or quality will be lost. This is known as a “lossless” file.

The image below shows the different processes for JPEG and RAW files from camera to ready to view. 

Blog at WordPress.com.

Up ↑

Design a site like this with WordPress.com
Get started