P2, P3, P4, P5
Quite often when I’m taking photographs, I try to produce something that you can’t necessarily achieve using a camera on a phone. So, drawn to slow shutter speeds, I really wanted to produce some images like Alex Titarenko’s from my research.
My concept for this project is to show the beauty of some of London’s buildings and structures and how people of today lead busy lives and perhaps always rushing around not taking in the views.
All of my final five images were taken using a tripod to stabilise the camera and stop camera shake. I also used a neutral density filter, ND16, to allow me to use longer shutter speeds during brighter days or brighter lit areas so not to over exposed. They are also all shot with an ISO of 100. This allowed me to get the best quality photographs in daylight conditions.
Below are my final five photographs. I had originally wanted to try and produce some Black and White images taking inspiration from Alexey Titarenko’s motion blur photographs.
However after some class discussion and feedback we all decided they worked better in colour.
Liberty’s
From my recce photographs you can see that I wanted to try and capture the Liberty building. With the flow of traffic and my focus not quite right, I ended up choosing this photo below. It was taken behind Liberty’s along a pedestrian walk way leading to Carnaby Street. I felt capturing flows of people gave a better effect on my images than traffic did and keeping that ghostly feel.
Kingly Street, Liberty’s
It was a very sunny day when I captured this photograph. Even though I was using an ND filter I needed to really try and control the amount of light coming into my images. Therefore I used a very high f-stop of 25.
There wasn’t a constant flow of people walking past me so I needed to wait for groups of people to approach before taking the photograph. Any longer than 1.6-2 seconds was over exposing the Image.
Within post production I had to work a lot with the exposures on this photograph. The original image was a lot darker. Lightening the exposure allowed the centre of the photograph to be nicely exposed, brightening the darker areas of the pub entrance and building facade.
I also lightened the shadows that formed the people using the brush tool with curves on Photoshop. This draws the eye to the centre of the photograph where you can see the great detail of the pub and the motion blur from the people.
However in bringing the exposure up I had lost the colour in the sky. To bring this back I worked on a separate layer and darkened the whole photograph. Then using a mask I exposed the sky using the brush tool(soft with a low opacity). The areas around the building were tricky so zooming in helped not to darken the top of the building and chimneys.
Bringing the blue sky back into the Image created a good colour balance to the whole photograph and kept the focus towards the middle.
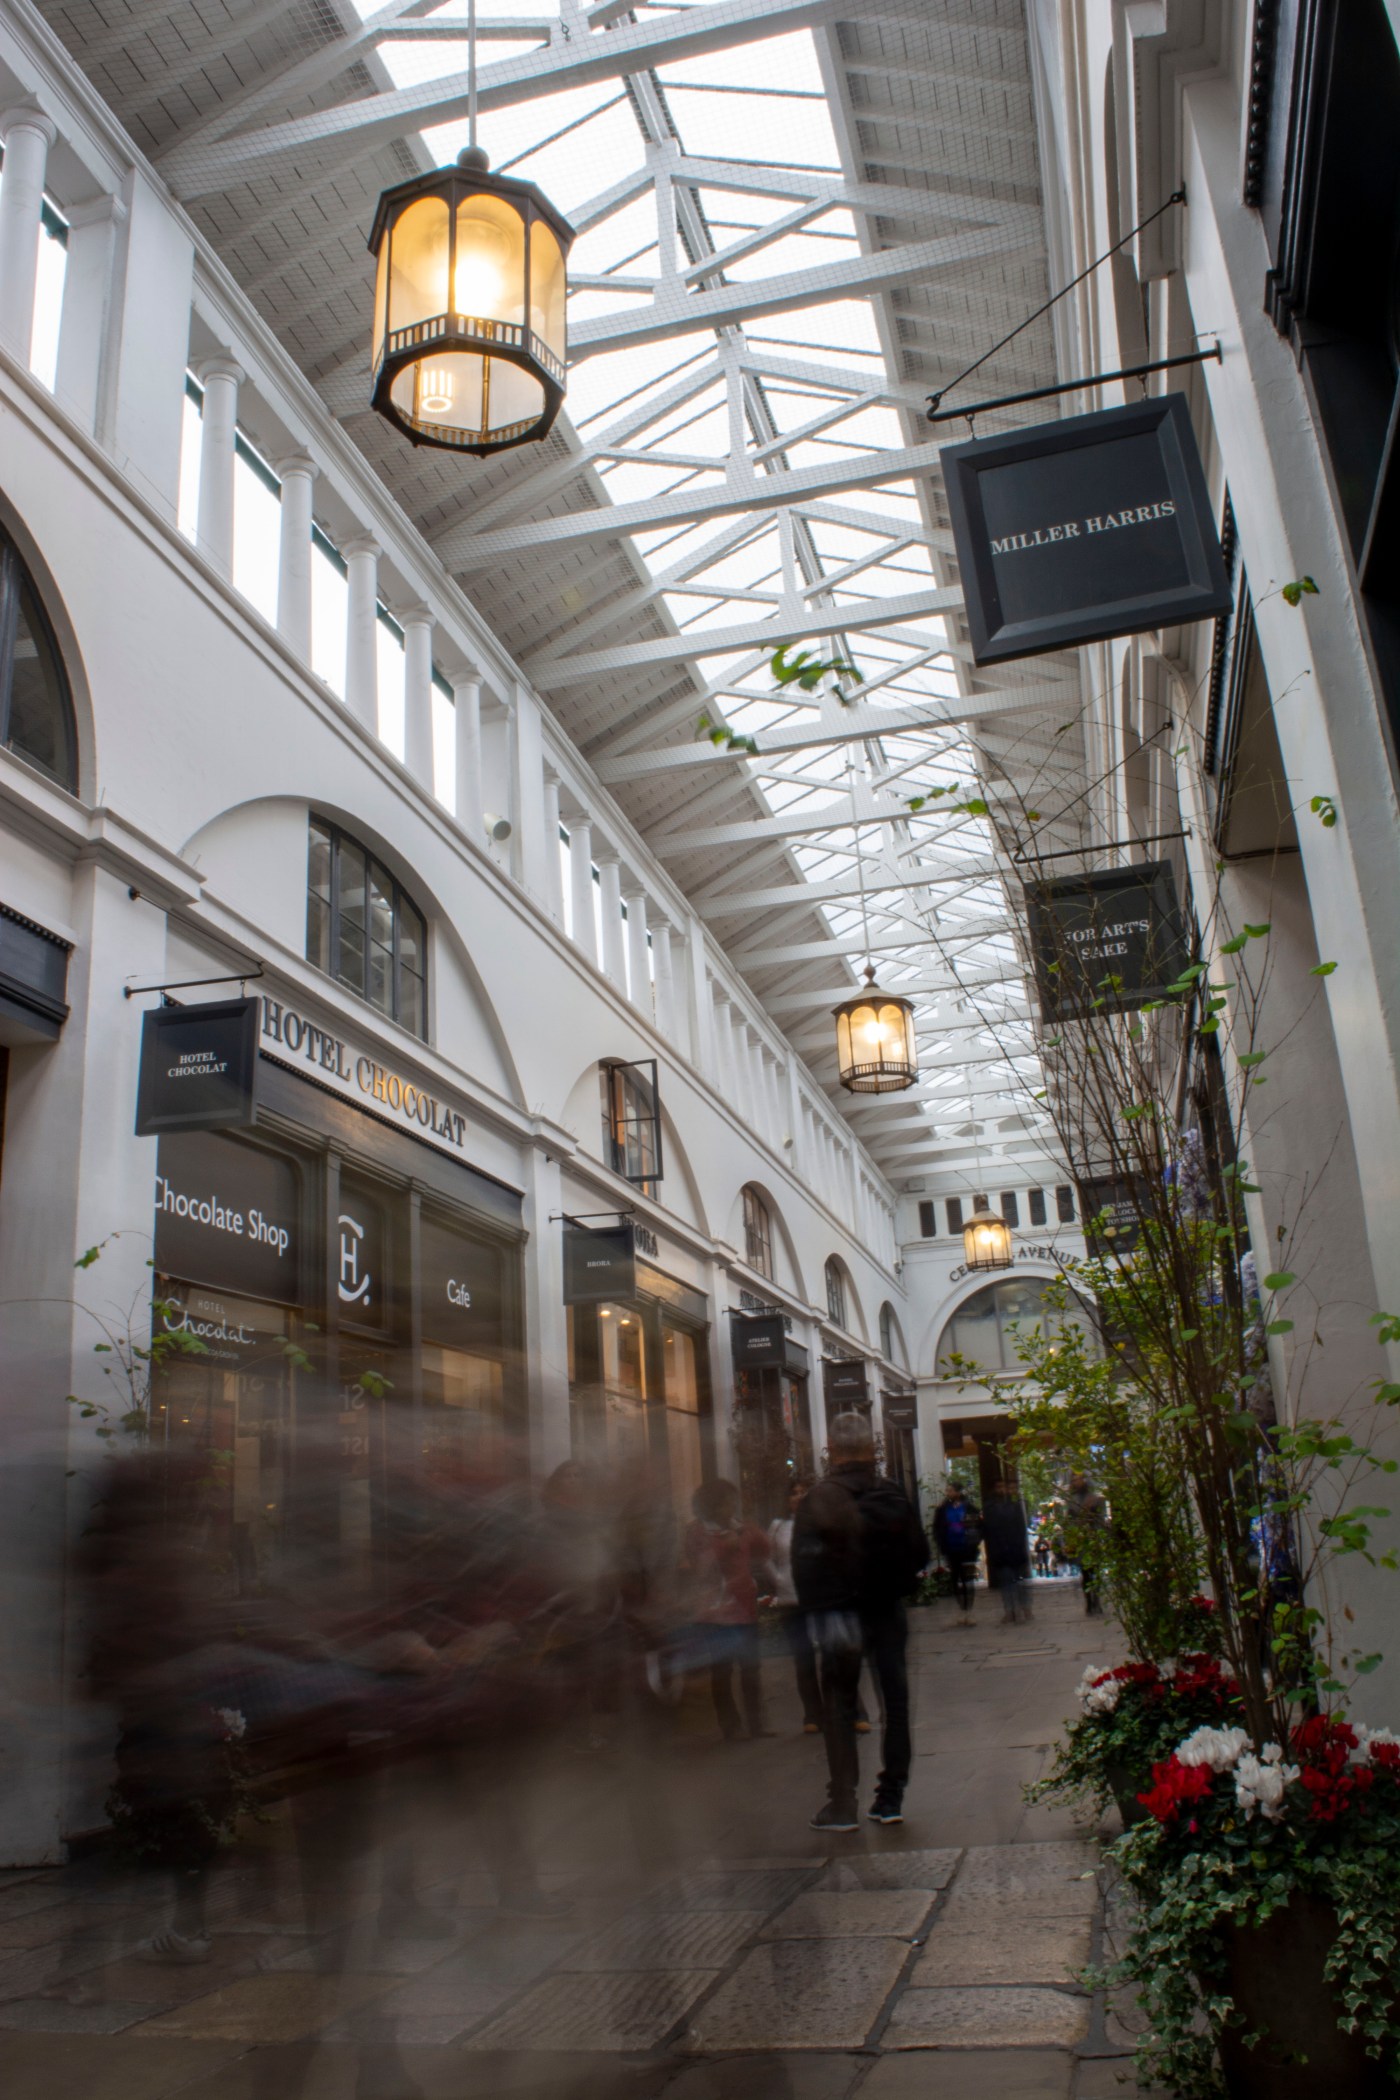
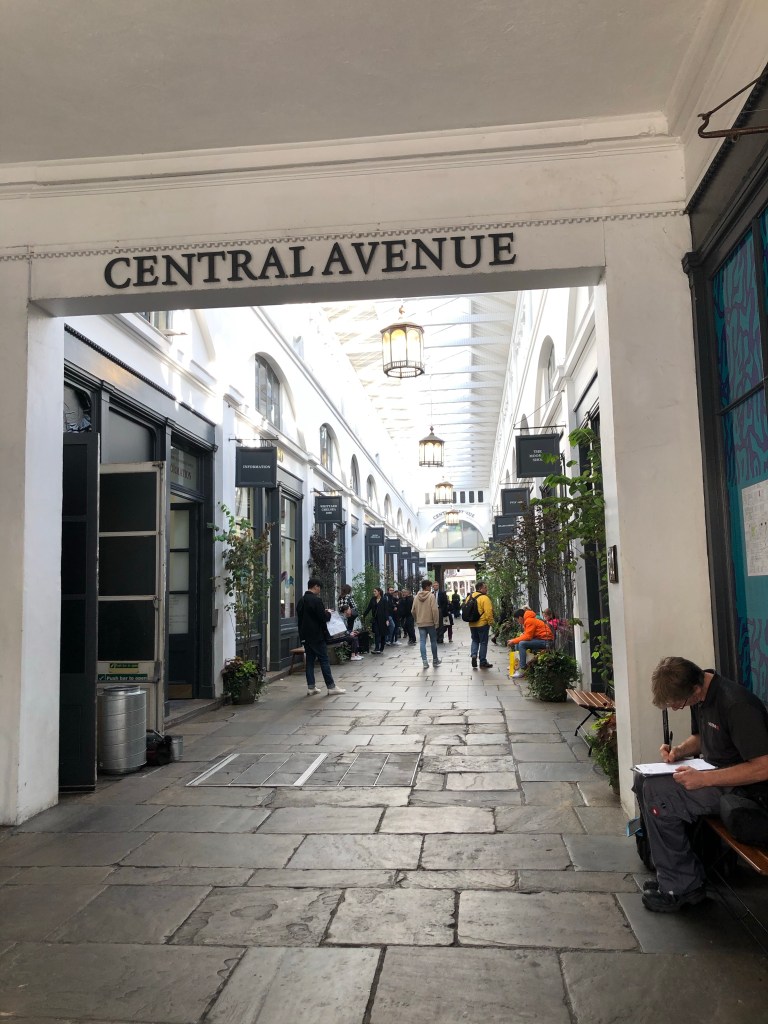
Covent Garden
This photograph was not my initial vision that I wanted to try and capture at Covent Garden. Trying to use a tripod in the market stall areas was not allowed and as I was using longer shutter speeds I needed to stabilise the camera somehow. I was not wanting to give up but really struggling to find a solution.
(iPhone)
I was so pleased to be able to bend the rules and get one of my final five photographs.
Central Avenue (see photo below) was within the grounds of the market. All along the shops within were benches. I managed to set up my tripod on the smallest setting and rested it on the bench. This way, I wasn’t causing a trip hazard or breaking any rules and was able to stabilise the camera to get the shot.
(iPhone)
It was on this recce that I had decided to switch my lens focus from manual to auto. I have mainly used manual focus up until now, thinking to be a good photographer that is what I need to master. The only problem with that is that you think you have the perfect shot, however you get home and zoom in on a bigger screen and realise you’re just off with the focus.
Central Avenue, Covent Garden
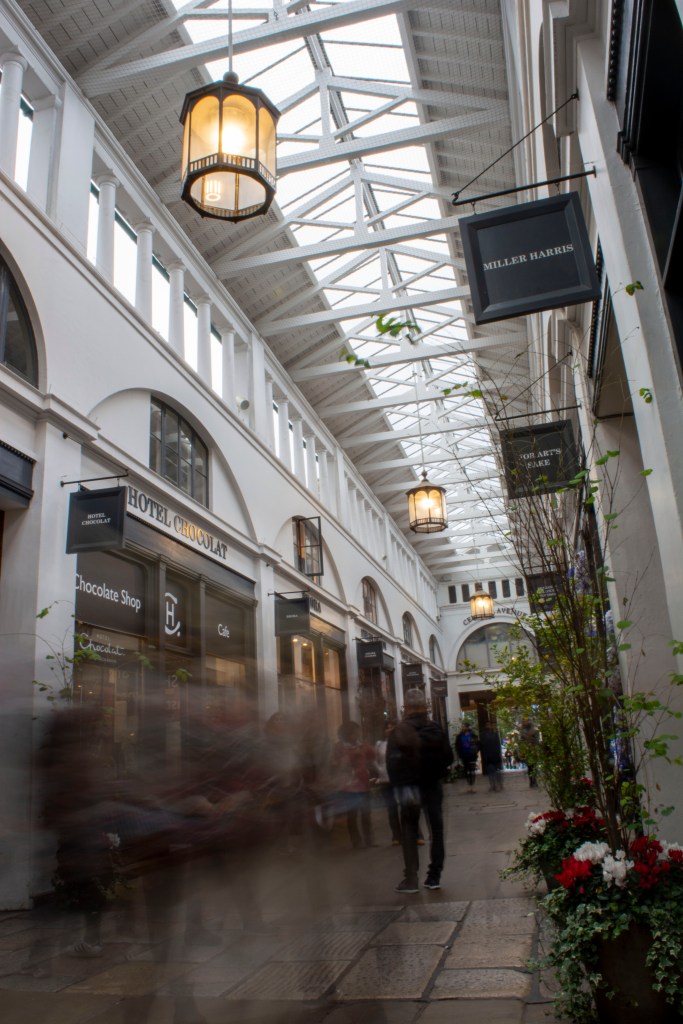
Although this walkway was undercover there was still a lot of light coming through the windows at the top so I decided to use a fairly high f-stop to try to minimise the light. Using a shutter speed of 2.5 seconds allowed me to capture stationery people and moving people quite well.
Over all I am really pleased with this photograph. The walkway being narrower than the market halls allowed there to be a constant flow of people walking through. Exactly what I needed. I like the perspective of the image however, maybe I could have aligned the image better, made the right hand side shop fronts line up with the right hand side of the frame. This is something I could go back to do in Photoshop.
This photograph I felt looked good in black and white however to keep cohesiveness within the final five, I kept it in colour.
Leadenhall Market
This photograph is my favourite. I love all the architectural lines and shapes which are strong and stationary in the photograph, compared to the soft flowing motion of the blur from the people walking past.
Taken during lunchtime it made for a constant flow of people which was ideal for the type of photograph I want to achieve. I didn’t ask permission from anyone to take photographs here however I knew I wouldn’t be able to set up a tripod in the middle of a busy area. I found a spot close to the central area I wanted to photograph and positioned myself to one side, tucked slightly behind a pillar by a shop. This way I wasn’t causing an obstruction or a potential trip hazard.
Leadenhall Market
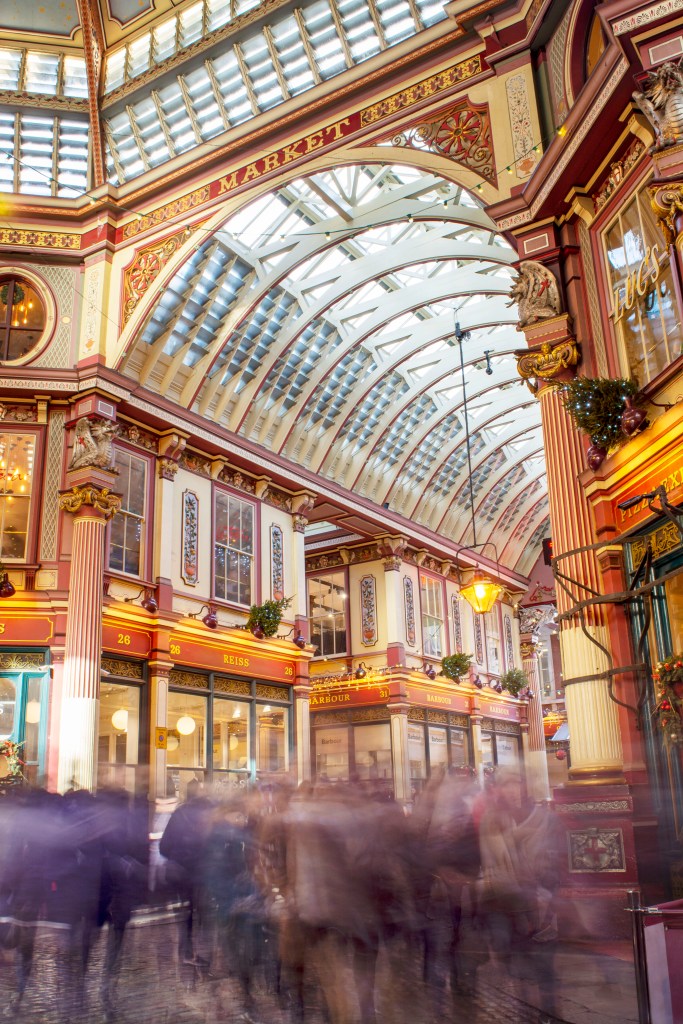
Within Leadenhall Market, even though you can see the light coming through the top of the structure, it still was quite dark inside. Using an aperture of F-11 I managed to use an 8 second shutter speed to capture lots movement flowing through the market hall. I am very pleased with the result.
Progressing through this project, I have gained more confidence in my ability to use Photoshop. Using several different layers, I darkened and brightened the exposure in certain places. I darkened the higher windows and over exposed pillar. Then brightened some of the shop fronts and people shadows. Lightening the shadows from the people enables the viewer to see the shapes of bodies and faces and adds balance to the image. I also slightly darkened the to corners to help draw the eye towards the centre of the photograph.
Borough Market
At Borough Market I found it quite hard to position myself with my tripod somewhere that wouldn’t be a trip hazard. A lot of the areas in the market I wanted to photograph, I would have needed to be in the middle of the central walkway or road. I did however find a spot between the market halls that I could set up my tripod safely. This was between a wall and a pillar, so the pillar protected passers-by from my tripod.
Borough Market
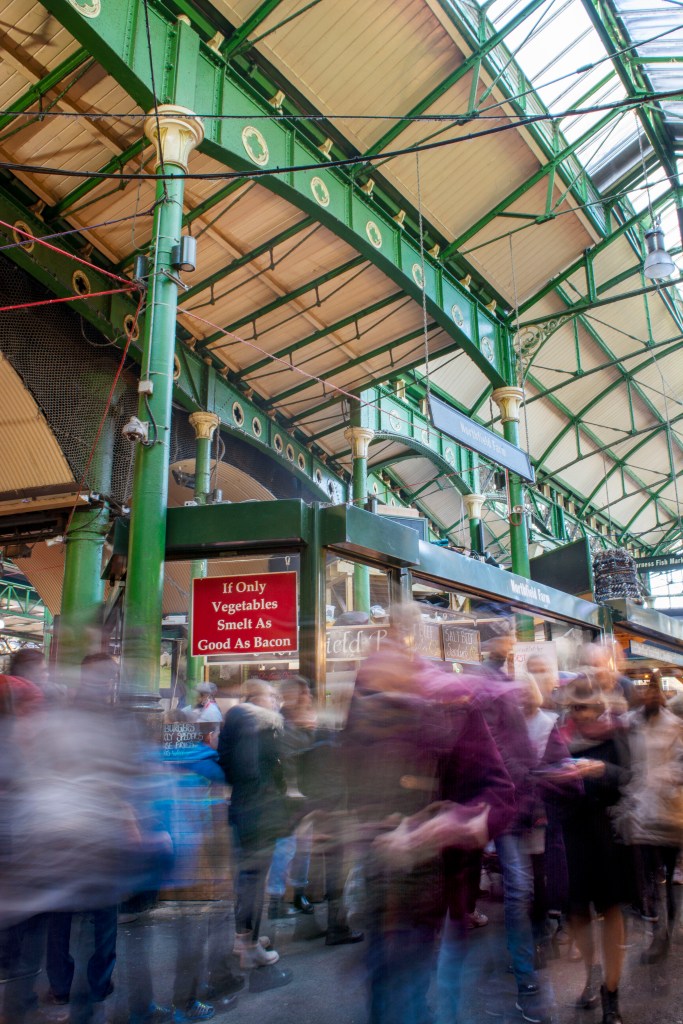
Using only a two second shutter speed you can make out some of the faces and body parts from the people walking past me.
Again I felt my images were quite dark so I needed to do some work in postproduction to lighten the whole photograph. Perhaps I should of changed my ND filter to ND 8, something to consider for the future.
In post production, before lightening my exposure I sharpened the image. I worked on different layers with masks when brightening the exposure, as I had to keep the top right-hand corner from being overexposed when lightened. Working on the motion blur, I lightened the shadows. This defines the blur and you start to see some faces emerge.
Borough Market
This photograph is my least favourite from my final five. I had planned to photograph five different areas however I ran out of time and decided to use this photograph also taken at Borough Market.
Shot from the same spot as the above photograph, This was the view behind me so I picked up the tripod and turned 180°.
Situated under the railway bridge, this made for some great lines from the iron beams. The converging lines bring the viewers eye down towards the centre of the photograph focusing on the central brick arch and motion blur.
Borough Market
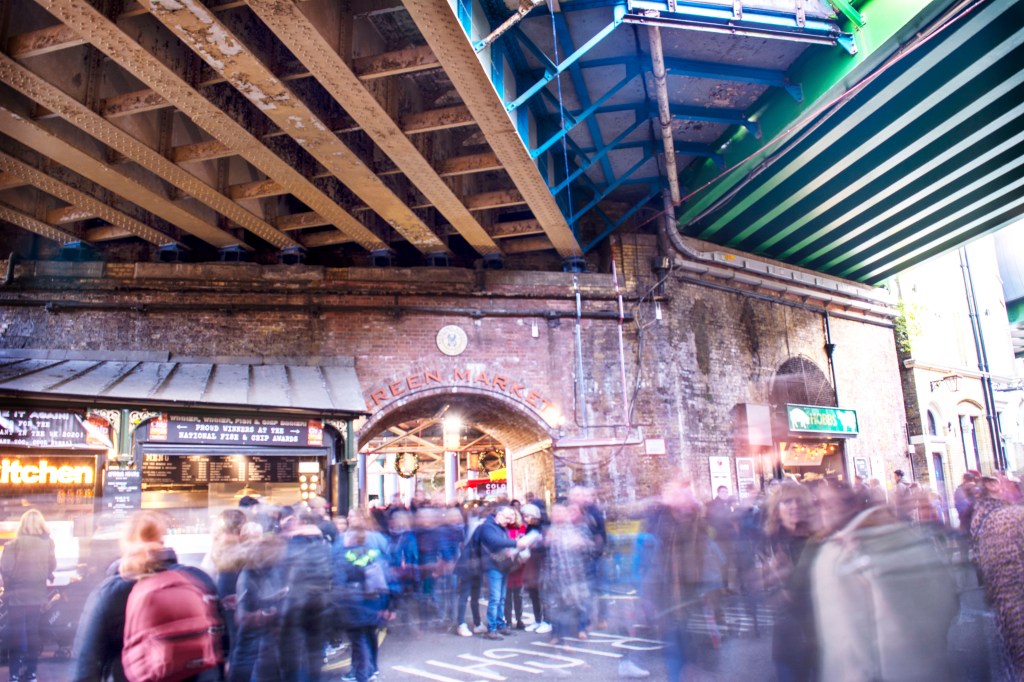
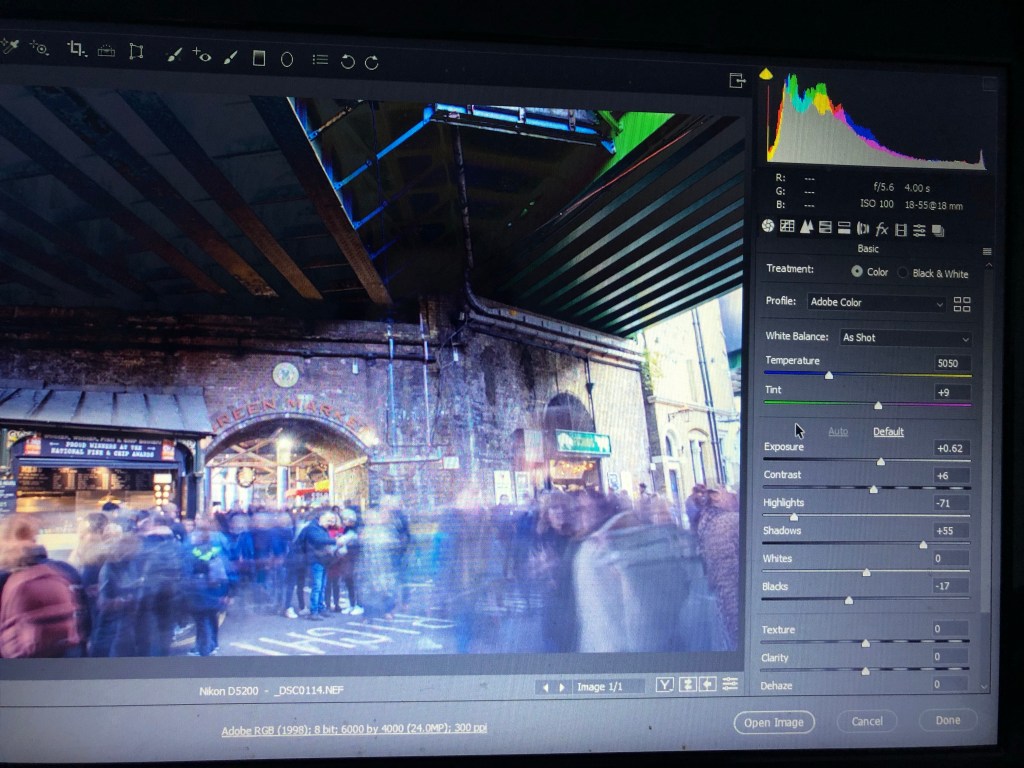
It was quite dark under the bridge, so I was trying to let as much light come through as possible by using a lower aperture of F stop 5.6. Using a shutter speed of four seconds helped with letting more light in however the original image was still quite dark. Thinking about it now I probably should have changed the ND filter to a lower number filter, to let in a bit more light. Therefore I wouldn’t have had to do so much brightening in postproduction.
In post production I initially sharpened the photograph and used the auto button in camera raw to help guide me with the exposure, highlights and shadows on this photograph. In photo shop, I then proceeded to lighten more of the image as I felt it was still a little too dark. I wanted to see more of the lines under the bridge. I had to darken a few areas where the sun was shining through.
After doing post production on this image, I do feel that I have over done it a little across the central part. I have lighten too much and therefore lost some colour in the process, however I do like the green that I have pulled back from the metal beams.
I didn’t manage to do any test prints before I sent my final photographs off to the printers, maybe that is something I might do in the future, to really confirm I am making the right paper choice. I decided to go for a Fuji velvet mat paper. I knew I wanted to keep the paper type basic, so not to distract from the detail in the images.
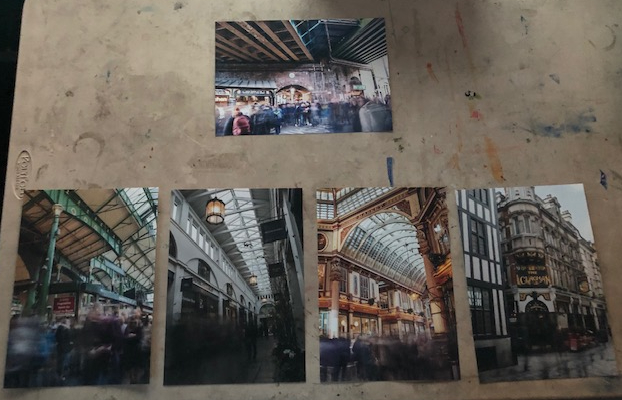
The photograph below shows how I would arrange my final five images on a wall for display. I feel if all images were taken with a portrait view they would have all sit nicely together. However as one image is landscape I have set it above the other four. This allows it to sit alone above, yet leads into the other four, almost like a preview before the other stronger images.
I have taken a lot of inspiration from Alexey Titarenko’s work. I have tried to re-create similar photographs combined with my ideas for the project. Using the motion blur of people, just like Titarenko, but in my photographs I am conveying the busy lives of people passing beautiful structures and land marks.
It has been a little restricting with where I position myself to photograph, this has played a big factor in planning locations and compositions.
I have made many mistakes throughout this project like my time management, knowledge of Photoshop and remembering to charge batteries. However I am going to use them as a learning curve to take forward in my next project.
Generally I am pleased with my outcome and I will definitely continue experimenting with motion blur and slow shutter speeds.

Leave a comment